Your Local Broker, Internationally
Berthon UK
(Lymington, Hampshire - UK)
Sue Grant
sue.grant@berthon.co.uk
0044 (0)1590 679 222
Berthon Scandinavia
(Henån, Sweden)
Magnus Kullberg
magnus.kullberg@berthonscandinavia.se
0046 304 694 000
Berthon Spain
(Palma de Mallorca, Spain)
Simon Turner
simon.turner@berthoninternational.com
0034 639 701 234
Berthon USA
(Rhode Island, USA)
Jennifer Stewart
jennifer.stewart@berthonusa.com
001 401 846 8404
Dashew Offshore’s FPB 78 takes shape
October 1st, 2013
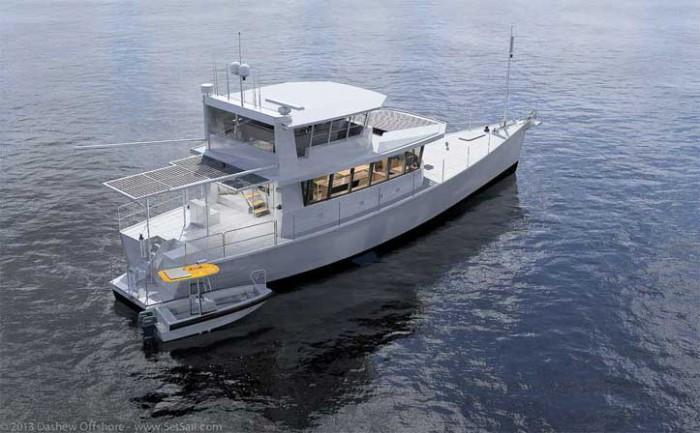
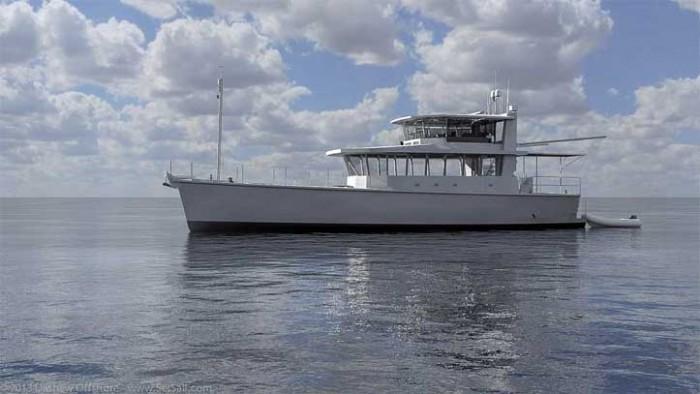
Plate is now being cut for the first of these astonishing yachts – absolutely the last word in 4 wheel drive motor yachting. She is being built for designer Steve Dashew at Circa in New Zealand who have built the entire FPB series. Steve has spent literally thousands of man hours on the design of this new addition to the fleet and has carefully looked as every aspect of the execution. Here at Berthon, we are particularly fascinated by FPB 78#2 as she will start construction straight behind Steve’s yacht and is being built for an English client of ours. The evolutionary process of a new design is a never ending voyage but there are many great ideas going into this yacht including huge advances in the use of solar array, the commitment to build to MCA category 0, and a host of other new ideas. Steve explains the thinking behind some of these innovations –
The FPB creative process goes through many phases, the last of which is fine-tuning details. With the release of the FPB 781-134 model for construction, we thought it might be time to show you how things have evolved.
What follows is an update on the FPB 78 project. If you are not already familiar with the Dream Machine, you may want to consider an in-depth review, which can be accessed here: http://setsail.com/fpb-78-dream-machine/
Our design process is parametric with constant re-analysis of the ever changing mix of design ingredients. The 3D modeling tools we have makes it possible to investigate a variety of alternate approaches. This takes time, (much!) more than the olden (pre 3D) days, but results in a better integrated, more functional, and visually appealing end product.
Throughout the following renderings you will notice that the fabrics, flooring, and surface finishes vary. We have yet to settle on the decor, and these variations are a part of the hunt for our final aesthetic package.
Ready for the tour?
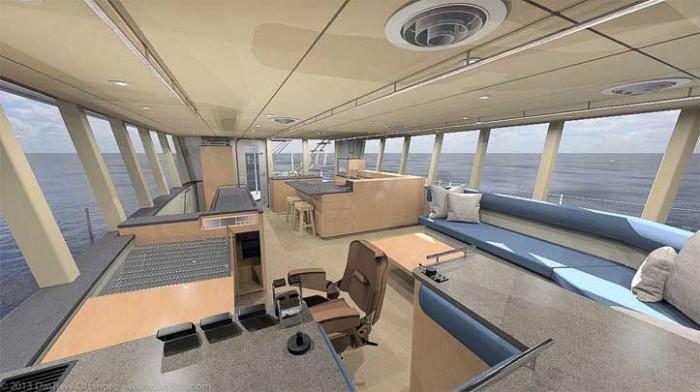
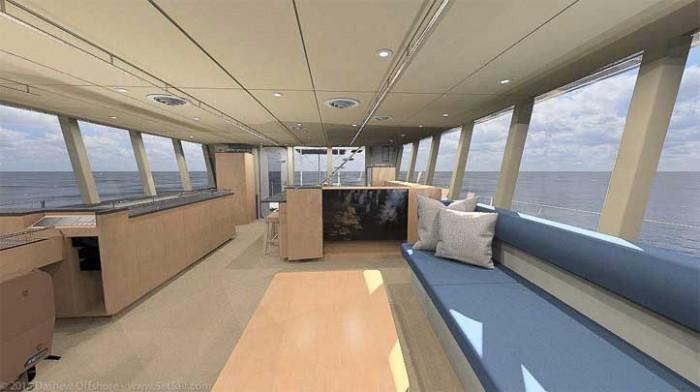
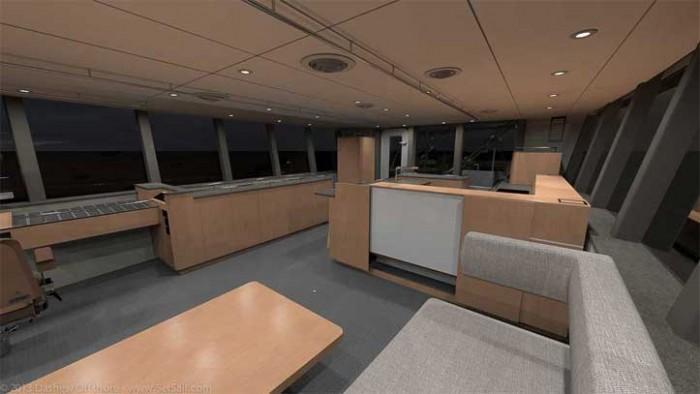
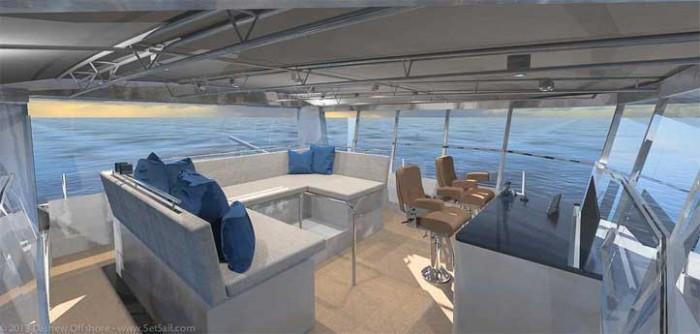
The Great Room
The great room offers so many layout opportunities that it has taken a while to hone in on an approach which offers us an optimum combination of functionality, seagoing and anchored ergonomics, ambiance, and the flexibility for future changes in requirements.
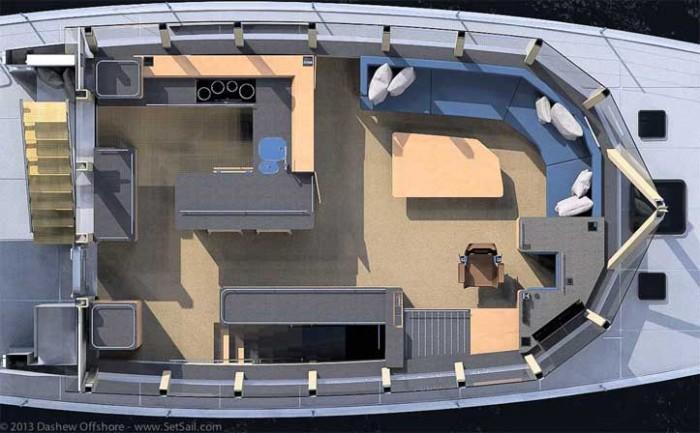
Now having a better understanding of the totality of the FPB 78, combined with clarity about how we want to use the new Dream Machine, the final pieces of this puzzle quickly fell into place. The plan view above looks similar to what we started with, but there are several important differences.
Galley
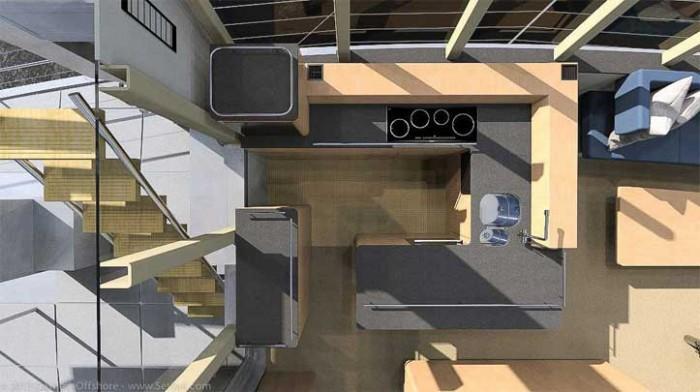
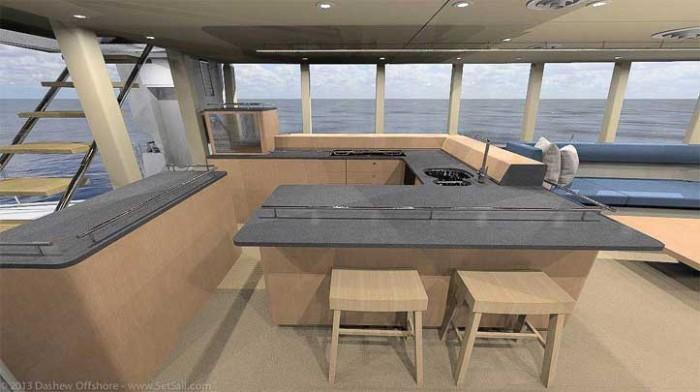
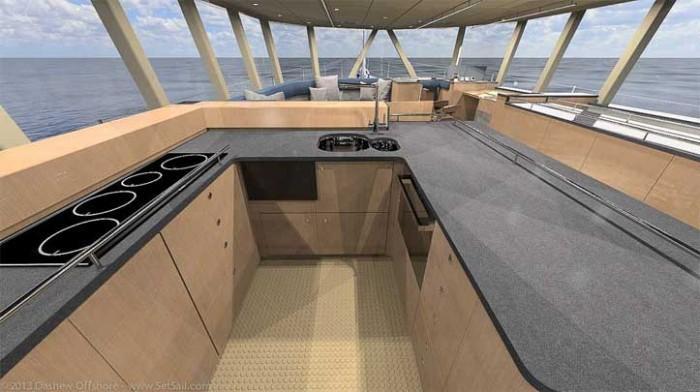
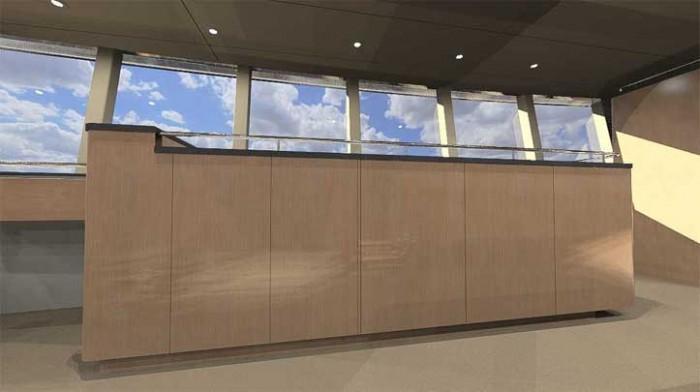
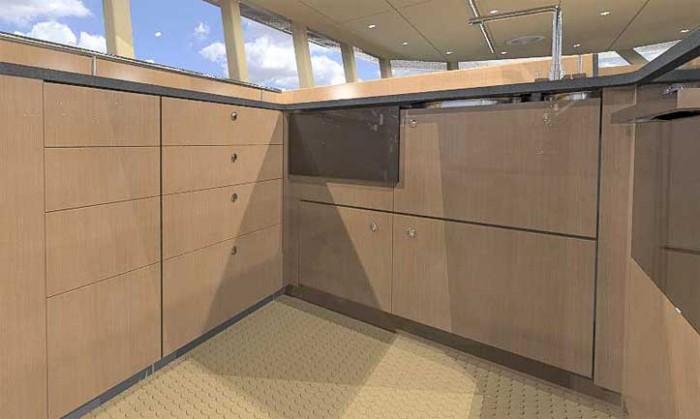
The galley layout has been refined to make it more open visually, while enhancing counter space and appliance ergonomics.
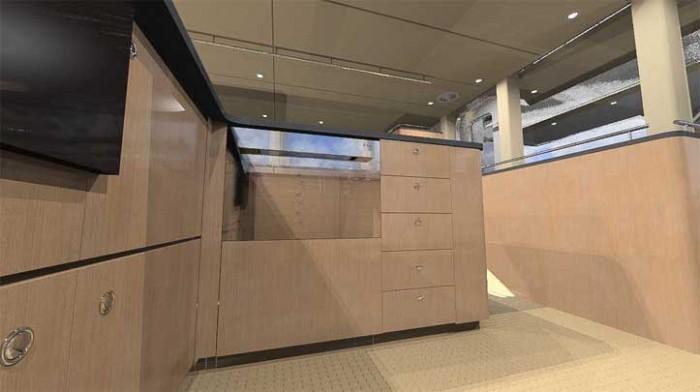
We have changed the fridge/freezer to a series of separate, under the counter units, with drawer access. There are two freezers in the aft port corner, facing towards the center, and a pair of fridges along the aft wall facing forward. The oven is now in the aft corner.
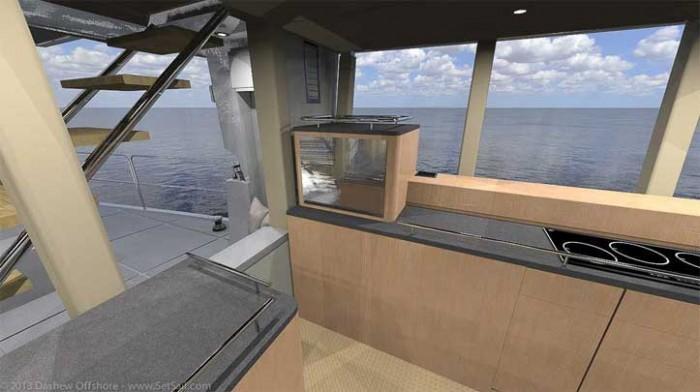
We think the view from the galley is quite lovely. Just add a few icebergs, or a white sandy beach ringed with coconut palms, and we are in the real world. The induction cooktop is as before, to port, with the dishwasher built in opposite on the starboard side. We have allocated space under the forward counter for a microwave. There is lots of work surface.
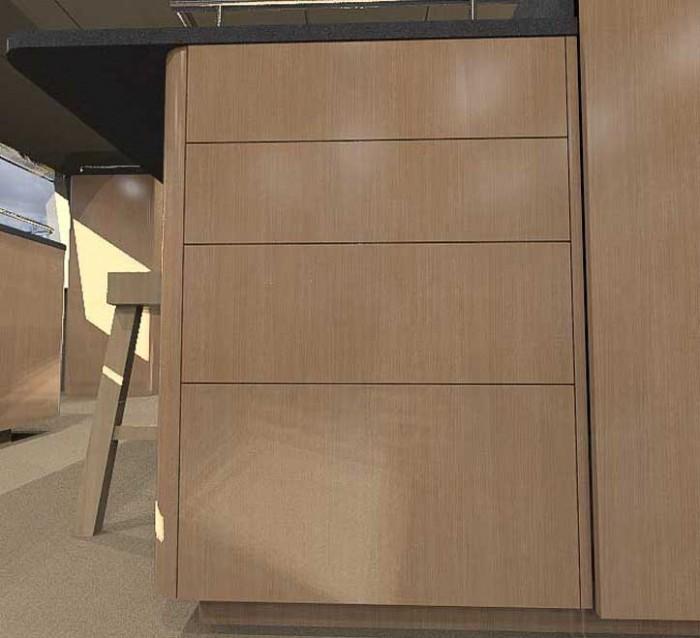
And there are drawer stacks on the port side which extend aft of the cooktop, with another stack to starboard. There is also a large drawer under the dishwasher, with more space available beneath the microwave, and behind the countertop lockers on the coaming top.
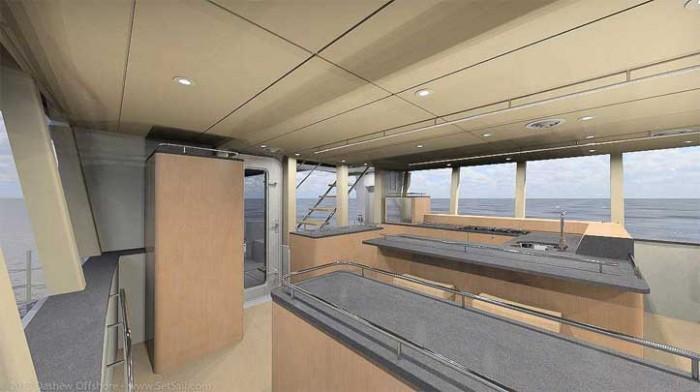
Turning around now and looking aft, the oven is on the countertop, and you have a working view over the fridges and freezers. The rail around the perimeter of the oven cabinet is for both containment of baskets and a convenient hand rail when at sea. What we have not yet settled on is the large galley appliance storage. These may end up in a locker on top of the fridges, or just sitting on the counter.
Windows have been extended aft one mullion, and the space outboard of the washer/dryer cabinet in the starboard corner will be used to hang coats and sweaters.
The aft great room/galley arrangement has the following advantages:
• It is more open, and does a better job of visually incorporating the aft deck into the interior space
• We now have an area in which to mount the great room extraction fans high and outboard to port, so they will do a better job removing galley odors
• There is more counter space
• Over counter locker storage, arguably the most valuable, has been increased
• We have space outboard of the washer/dryer cabinet for hanging jackets and sweaters
• The aft outboard panels above the coamings between house corners and the first mullion forward are now glass, helping to light the aft corners of the great room
• Sight lines aft have been improved for watch keeping and blind spots looking aft from the lower helm have been reduced
Great Room Extraction Fan System
The great room extraction fan system is a key part of our drive for cooling efficiency. Coupled with the natural pressurization from the forward roof overhang and Matrix deck coaming vents, this extraction fan system will reduce the need for air conditioning on those warm, still afternoons.
One of the advantages of the new galley layout is a more efficient positioning of the great room extraction fan system.
Now in the upper port aft corner, the duct is better placed to draw from the galley first, and then the rest of the great room.
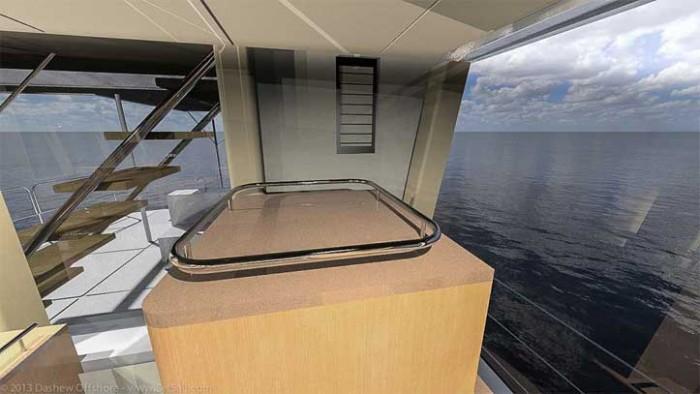
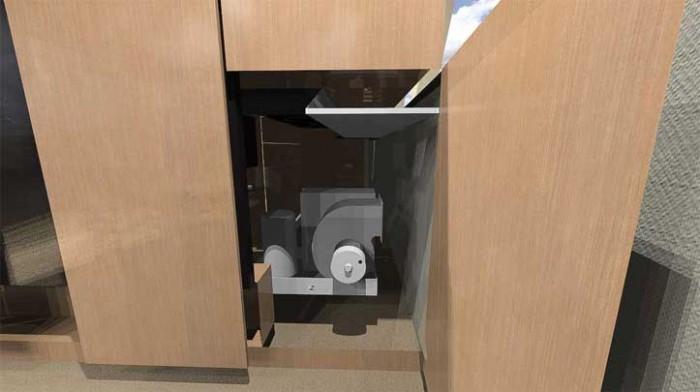
Here is a rough rendering of the outlet part of the extraction system. The fans are behind the grill (shown here as a white plate). In this location the extractors are easy to service, away from rain or spray, and remote from the interior, which will help attenuate their sound level inside..
Navigation and Watch Standing
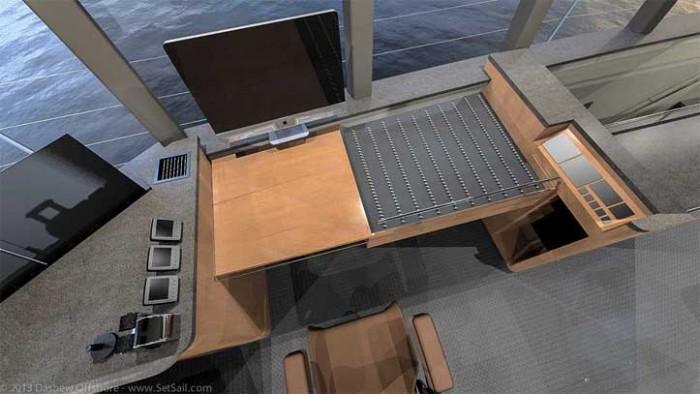
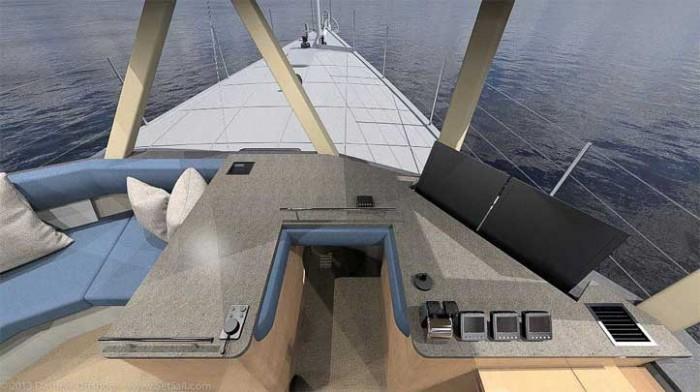
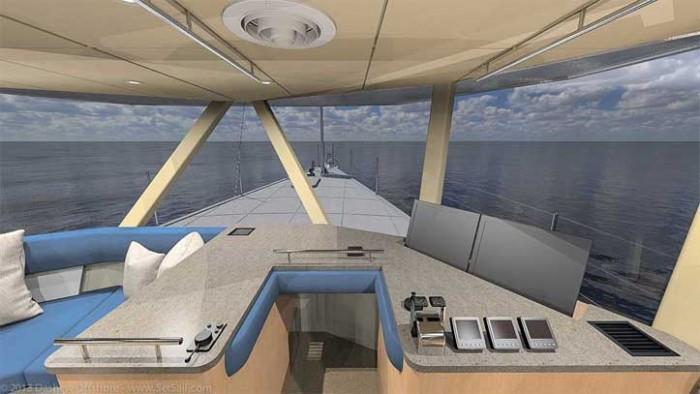
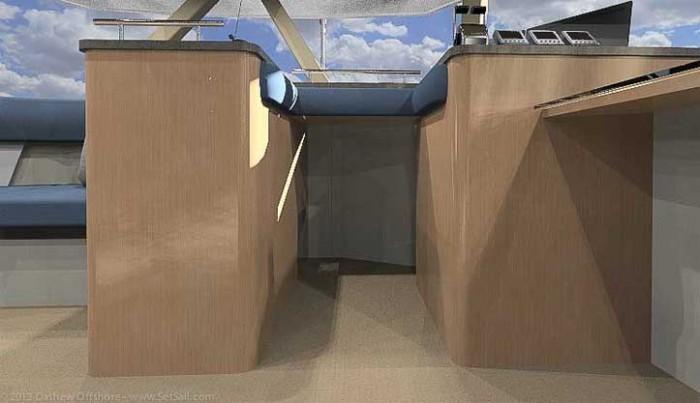
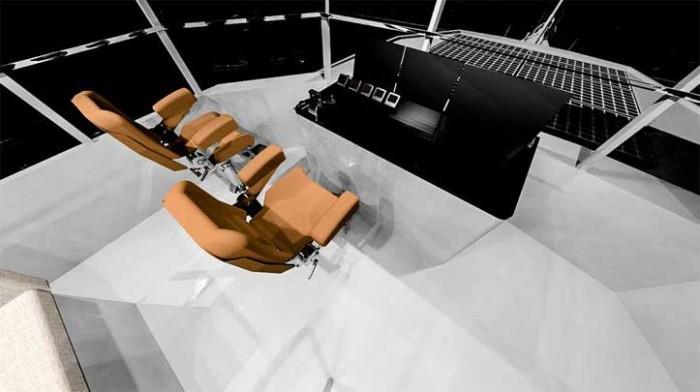
This is as close to a personal dream navigation and communications center as we have come, and has the following characteristics:
• All the controls, electronics, emergency switching, and breakers are close by
• The watch standing portion of the desk (forward facing) has a design that holds our body in place during rough weather
• Plenty of desk space
• Good sight lines
• A seating arrangement that allows for a relaxed posture when appropriate
• Communications and audio visual gear located where they are easy to use but not visually prominent
• Genset, inverter, and related controls handy to both watch stander and someone working in the galley
• Ease of black box installation and maintenance (under the desk along the coaming)
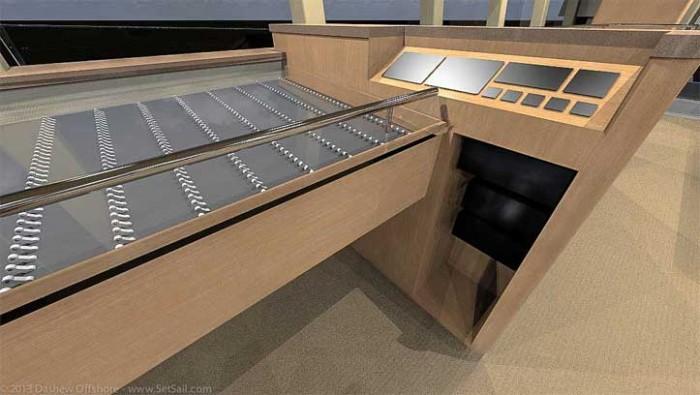
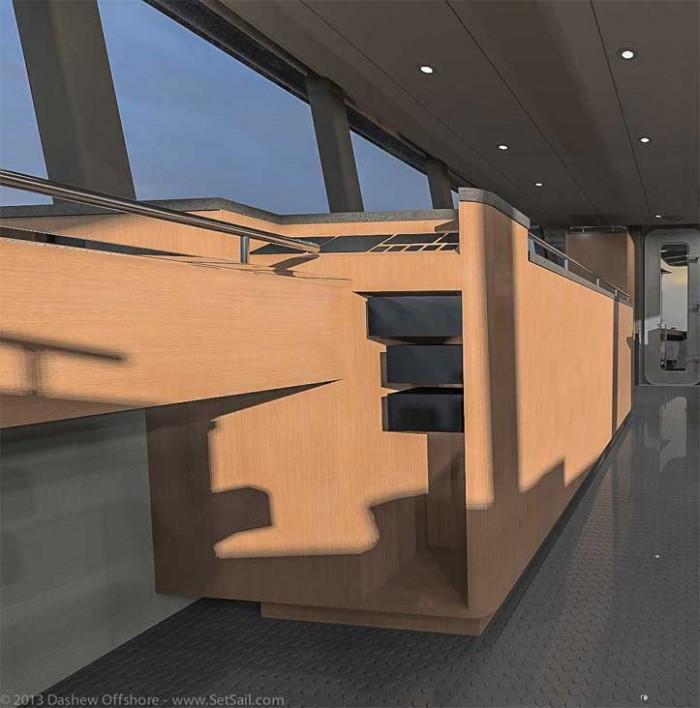
We think this is our most efficient nav station yet, an example of which is the switch panel to the right (aft) in the desk. This includes almost all DC and AC circuit breakers under a glass top, so they are handy and we can keep an eye on them (typically only required if there is a fault of some sort we are chasing). The majority of the time this glass top will act as desk surface and be covered with charts or other materials (we rarely need to refer to these breakers). But when we need to work with them they will be close, easy to read, and we don’t have to get down on our knees to see the bottom rows.
The top will have a clear drip lip on the underside as well as a seal to the panel framework. Between these seals, drip strip, and the angled face, spills should not typically cause a problem.
There are a few breakers that get switched depending on whether we’re at anchor, the dock, or underway. These will be grouped into sections, each with a master feed breaker. When we prepare to depart from being anchored, one breaker will take care of systems normally associated with being underway, including electronics and autopilots.
Another master breaker will control those items we normally turn off when leaving the boat, including windlass and pressure fresh water pumps.
The angled face aft is where the genset and inverter controls live, along with selector switches for items such as A or B autopilot, diesel heater on/off, and some of the light groups. Emergency switches are under the desk where they are out of the way, but close by if needed in a hurry.
Communication and entertainment equipment are in the open-faced locker under the genset/inverter controls. These will be shelf mounted, inset a bit, where they are easily seen if needed, yet out of the way. Access to their wiring is from the locker just aft. This approach makes it easy to install, change, or work on any of this equipment. We can also hang handsets under the desk where they are not an eyesore, but still in proximity to where they are used.
We have previously mentioned the watch standing “notch.” This would be used in difficult visibility situations where we want to be right next to the windows, probably looking for ice in fog with a rising sea (not fun). In this case the closer you are to the glass, the better the visibility. And when we are stuck doing this for hours, leaning against the padded notch will be most welcome.
The forward watch standing area has been widened slightly to allow for a larger array of electronics (not shown yet).
Entertainment Center
Although we do not watch a lot of movies or TV, we do enjoy using the television as a monitor for viewing photos. With the recent advent of 4K TV, photos are presented in stunning fashion, and we now want the largest practical screen we can fit – shown here as 55″/1.4m. The gray stripe below the screen represents a Sonos Soundbar.
4K screens have four times the pixels as the current norm, and invite sitting closer–hence this angle, to check on how close we can sit without having the settee arm in our view field.
Great Room Storage
Part of the the redesign process with the aft end of the great room involved monitoring the easily accessed storage areas. As we have substantial volumes of bulk stores under furniture and in various dedicated areas in the accommodation deck, the main concern is with drawer stacks, shelving, and countertop lockers. An inventory of these areas at present includes:
• Drawer stack forward inboard corner of galley inboard side of the entertainment cabinet
• Locker outboard of entertainment cabinet (shelves not shown in the rendering above)
• Long locker adjacent stairwell
• Drawer stack under cooktop with adjacent storage under microwave and sink.
• Drawer stack port side center island with oversize drawer under the dishwasher.
• Countertop lockers
• Forward face under port side of nav station
Accommodation Deck
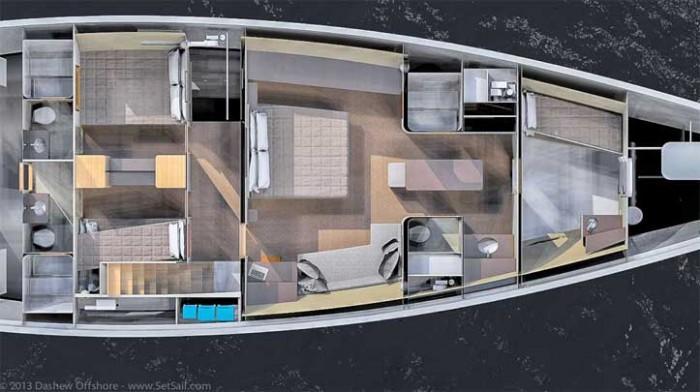
The basic layout of the accommodation deck has stood the test of time, and remains unchanged, except for several details in the owner’s suite.
However, these details have lead to a substantial increase in the functionality of the overall yacht.
Office Space
When we are living aboard both of us need office space from time to time. Computer-wise, much of this can be done with a laptop or iPad. Some tasks, like working on photos or design details, involves dual monitors in our ideal world. And we both require desk space from time to time. As the FPB 78 design has evolved and matured, it became apparent that we had a number of areas where we could spread out and work.
Take the Matrix deck for example.
There is a very functional navigation desk at the forward end where we can work (although the view might make it hard to concentrate).
In the great room we have the previously discussed bridge area to starboard, as well as the dining room table. In addition, there is the breakfast bar area. And in the owner’s suite we have a large desk to starboard off the doorway, and the second office forward. Which got us to thinking, why do we need two offices in our private quarters?
Owner’s Suite
With the evolution of the great room and Matrix deck, each with its own substantial desk area, it became obvious we did not need two desks in the owner’s suite.
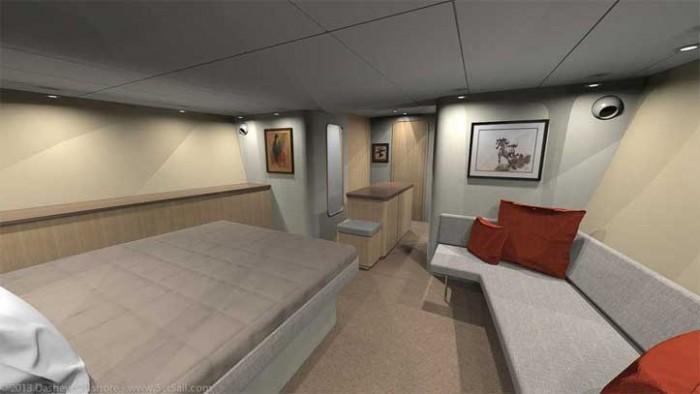
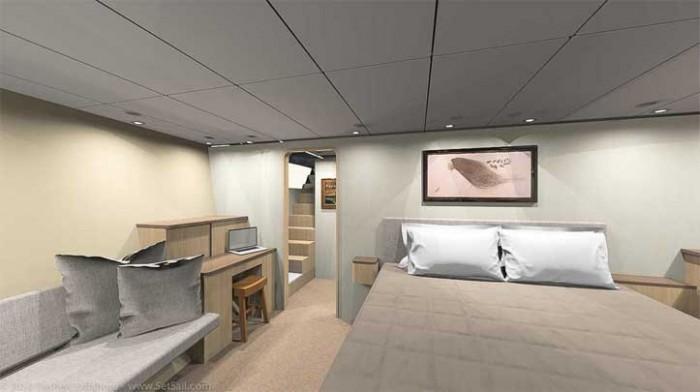
A single work space gives us a private office if desired, and opens up some interesting options for the forward end of the accommodations. What you see above is about to be massaged. The bed has been moved to port and the doorway will follow suit next week. Once this is done, we will have more space for the desk as work surface, and for the long spells at the computer to which we are accustomed.
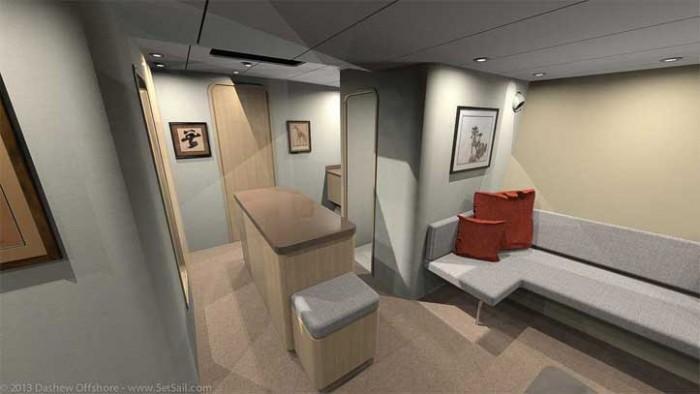
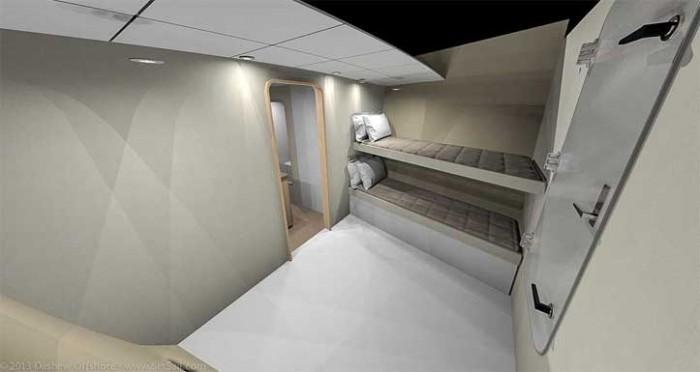
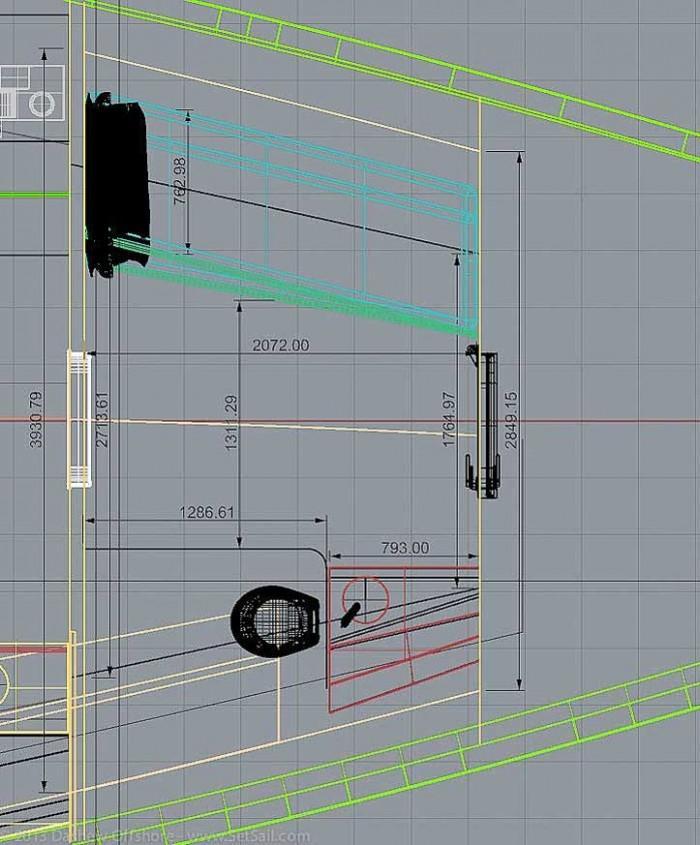
The rendering above shows the new forward end of the owner’s suite. Converting the forward office to a closet and moving the watertight bulkhead forward one frame (1.1m/42″) has created a large additional cabin immediately forward. By adding a watertight door to the forward bulkhead, this cabin has direct access from the deck.
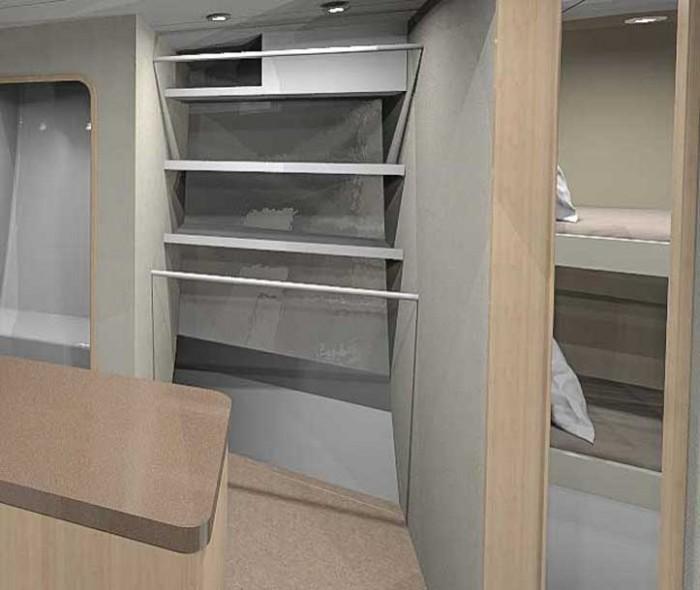
The closet itself has quite a bit of space, and this is just a first pass at how it will be laid out. What we know at this point is two layers of hanging rod, just under seven feet (2.1m) in length is plenty for clothing needs. There will be shelves for other items, and of course the free standing cabinet, between head and shower, will be full of drawers.
The very rough rendering above – since we are not yet finished with our evaluation of this space we haven’t spent the time to render properly – gives us an idea for the space. The drawing below has the actual dimensions. Notice how the headliner does not come all the way forward? We left it in its old position; this marks the former boundary of the owner’s suite, so you can see how much space was given up in the larger quarters to gain this space. We think it is an excellent tradeoff.
There are many possible uses for this area:
• Library/office (a really big one)
• Walk-in closet/storage room
• Overflow guest cabin
• Workout room
• Crew cabin
• Empty space for the future
At present we have no idea what we will use this for, so the plan is to fit a couple of bunks, which are also usable for storage, and leave the rest of the area open.
The layout above has a head en suite – quite a spacious cabin as you can see. However, for now we will make provision for a head and shower at the aft end of the forepeak, leaving this cabin open for future refinement.
A final comment on what we consider to be the biggest benefit from all of this. Air flow. Consider a typical tropical evening, with occasional rain squalls. If we leave the forepeak hatch open, and the new watertight door in the forward bulkhead is also open, then the breeze can waft aft through the owner’s suite, with the forepeak acting as a giant Dorade box. If a squall comes through, the forepeak will get a little wet, which is not a big deal at all.
Forepeak, Anchoring System, Chain Storage, Kedging
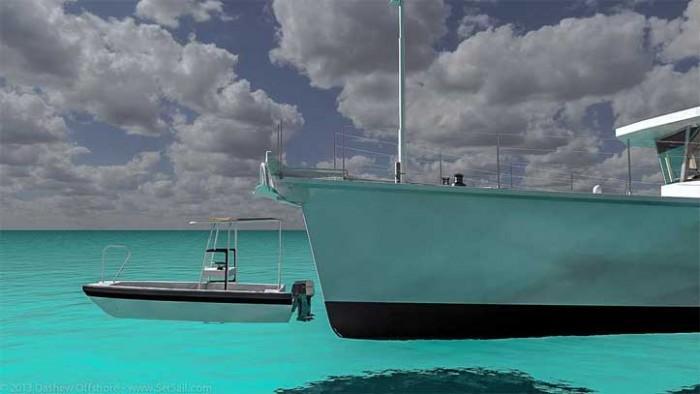
The FPBs are very soft riding uphill. They enter oncoming waves smoothly, and when the odd square wave shows its back, the drop into the trough is typically uneventful and quiet… until the anchor fluke comes into contact with said wave. Then there is a loud bang, and a dollop of spray is flung skyward. Once you are done marveling at how soft a ride the FPB affords, that comfort level becomes the new norm. Anchor bangs that were not noticed in the beginning become an irritant. With the FPB 78 we think we have this reduced to what should only occur on a rare, “Wow, look at that sea!” occasion.
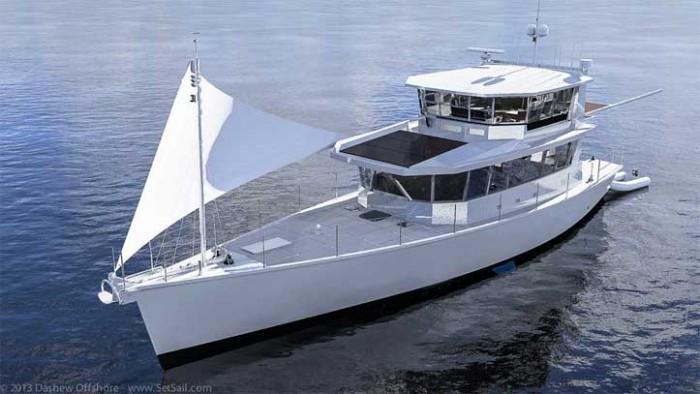
This is the result of bow shape, switching to a Manson Supreme anchor, and a 3ft/90cm higher anchor fluke, compared to the FPB 64 and Wind Horse. The anchor fluke is between 7 and 8 feet (2.1/2.4m) off the water, depending on trim. For visual scale, the T-top on the dinghy shown off the bow is 2m/6.5 feet off the water.
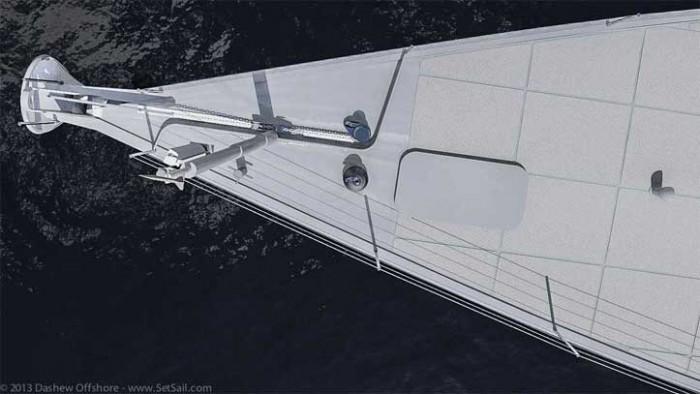
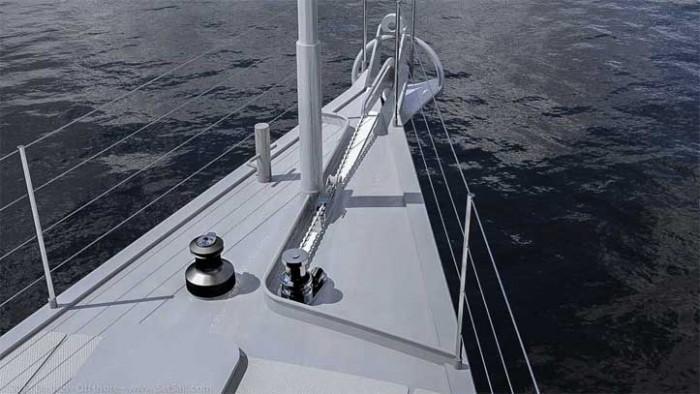
There are a number of changes in the foredeck. The first is designed to make it easier to hand a line across from the bow, or thread a snubber through the fairlead. Towards this goal the belting has been extended along the bow roller cheeks, and the roller itself has been widened. Towing/snubber fairlead is higher and further aft. And there are a couple of stanchions for bracing our bodies, along with an upper lifeline wire. There is a powerful self-tailing (Lewmar 65) kedge winch located forward, also handy for shore fasts, and a second anchor rode. The mast can be fitted with a jib boom and a larger deck hatch will allow storage and extraction of all manner of equipment. The big self-tailing winch and said jib boom will come in handy when lifting heavy gear.
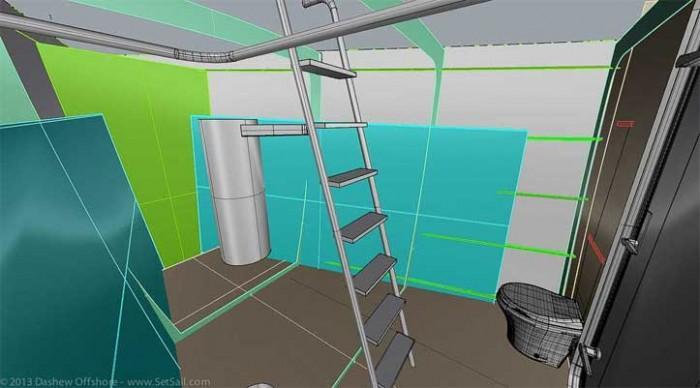
With the accommodation watertight bulkhead moving forward a frame, you might think the forepeak is a little tight, but there is twice the volume of the FPB 64 with fewer systems to compete for space, and a lazarette aft now to share storage of boatswain’s stores and toys. The rendering above will give you an idea of the space, and this does not show the volume below the sole. The teal colored shape starting at the collision bulkhead represents the size of the FPB 64 forepeak.
Solar Array
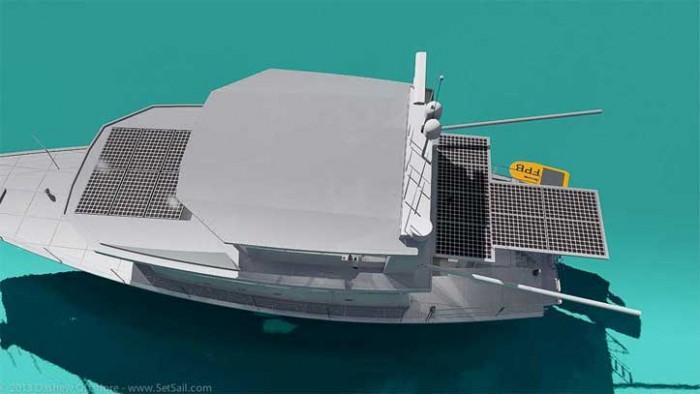
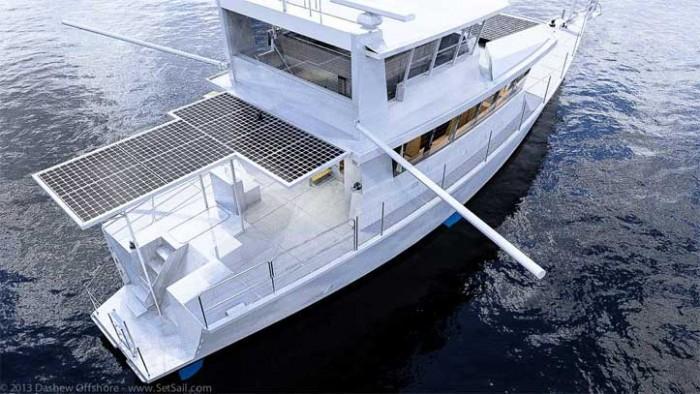
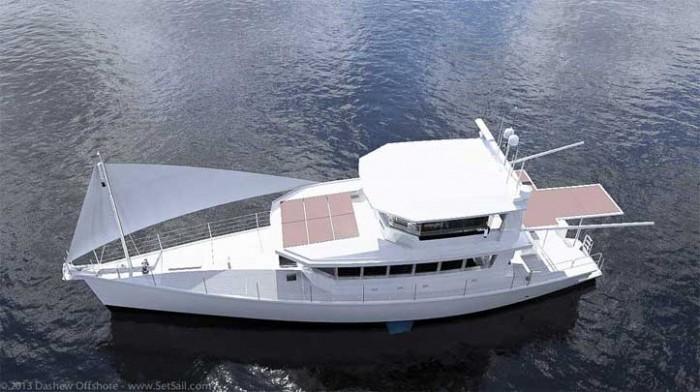
Solar panels keep getting more efficient, to the point where we are close to being able to run the boat at anchor totally on the solar array shown – possibly including air conditioning. From our original six panels, we are up to 14, with an additional eight panels aft.
By the time these are purchased, they are supposed to be rated at 350 watts each from the current 340. Of course we will be losing a bit for shadowing depending on angle to the sun, and on some days the clouds will reduce capacity, but 14 panels times 350 watts is a lot of juice on a sunny or cloudy day.
The solar gurus say to multiply the array’s output times a solar hour figure for your part of the world, and then back off for shading and sub-optimal angle losses. The math, confirmed by what we learned with Wind Horse in 2012, goes something like this:
14 panels x 350 watts = 4900 watts x 5.5 solar hours (reasonable average for a lot of cruising locals) = 26,950 watts reduced by 30% for shading totals 18,865 watts. When you start adding up what can be done with this much energy, things get interesting. Much more on this topic as we finalize systems.
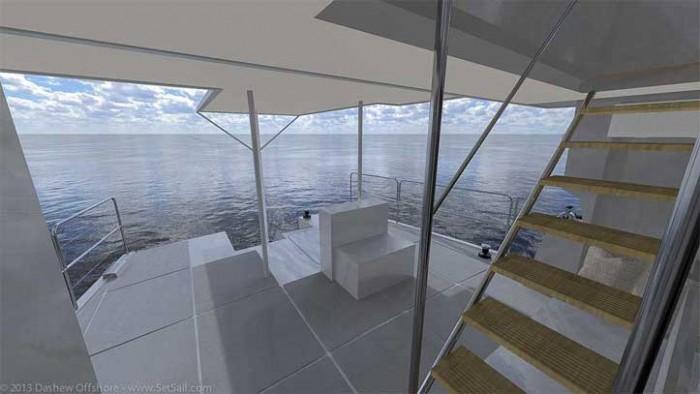
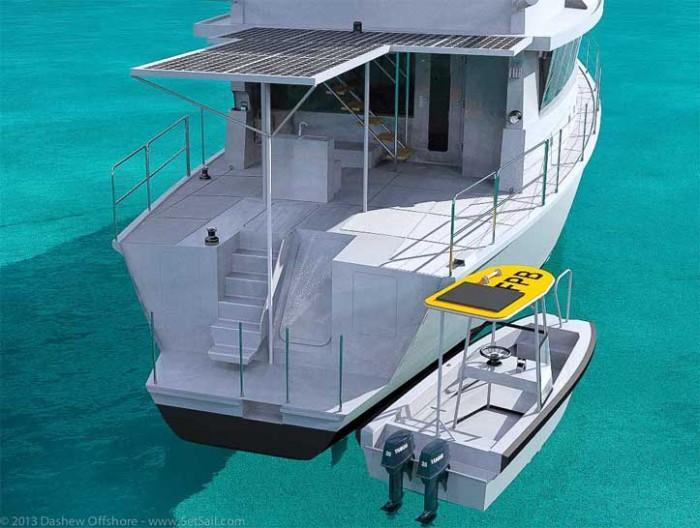
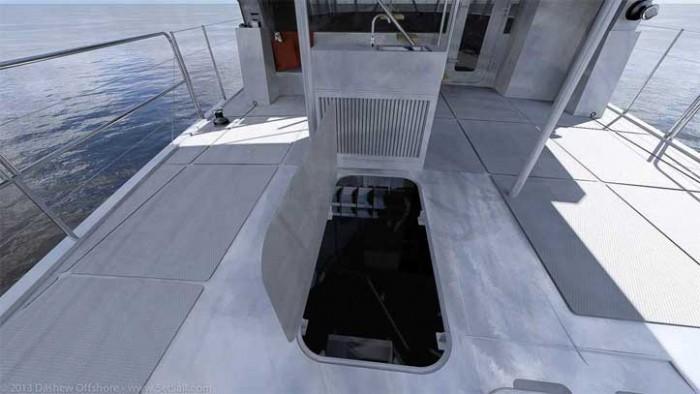
The aft array shown does more than simply generate a few kilowatts of electricity. It is also a shade and rain cover for the deck, and provides protection for the workshop/engine room deck hatch when it is open. Shown above looking aft from the great room doorway with dinghies launched.
On those squally days when you are caught coming back from town with a load of groceries, this overhead rain cover is just a step away from the dinghy.
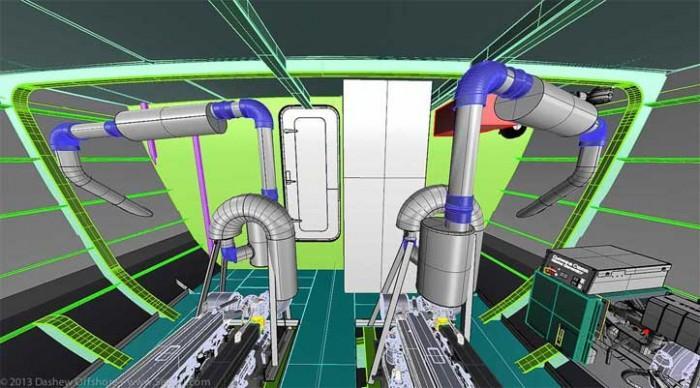
Engine Room Ventilation
Of all the many conundrums associated with a yacht designed to cruise under power, none is more difficult to solve than engine room ventilation. If you want a generous supply of fresh air, the ability to run extraction fans in really hot climates, space for insulating both inside and outside of the ducts, and room for a sound baffle or two, it is going to take significant space on deck and in the engine room. Reduce cross sectional area and your ducts will whistle – most annoying. Or, you can go to a pressurized system, with noisy high speed fans, and if the fan(s) quit, that engine room is in a world of hurt.
We have been wrestling with this issue since January, and although we had a solution then, we had a feeling we were missing something. Eight weeks ago, on the 17th (!) engine room ventilation model, the pieces fell into place. This lead to a cascade of discoveries which evolved into an entirely new aft end layout for our FPB 78 – one which the technically oriented amongst you may find very cool.
First the engine room supply air.
The fresh air supply duct parallels the aft engine room bulkhead, penetrates the engine room sole, and dumps its fresh outside air into the bilge. The FPB 78 engine room soles together with the hull, act as a plenum directing the fresh air forward towards the engine blocks. The cooler incoming air cannot begin to rise until it is past the sole edges, which just happen to be adjacent to the air intakes for the engines. Opposite the air intakes are the turbos, the hottest part of these engines.
The fresh air will continue forward a ways, washing over and cooling the blocks, and then rise with the natural thermocycle. On each side of the aft engine room bulkhead, a 1400 CFM extraction fan lies in wait. In cool climates, these fans will be idle until the engines are shut down, at which point they will help cool down the engines and the engine room itself. In warm climates we are guessing the fans will run at half speed.
Work Shop, Crew Cabin, Lazarette
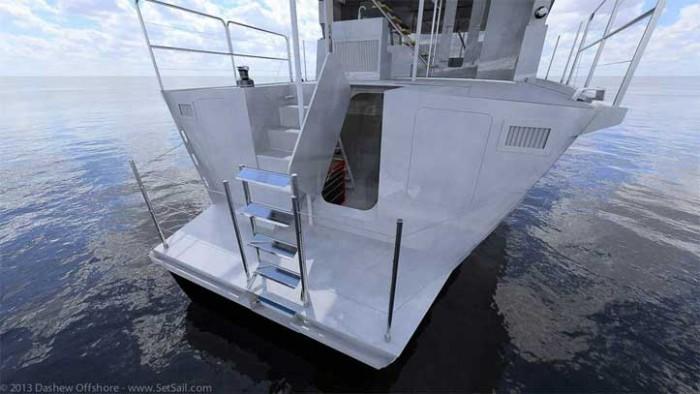
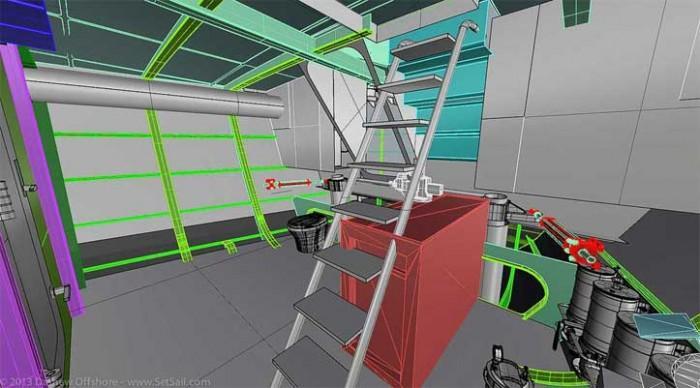
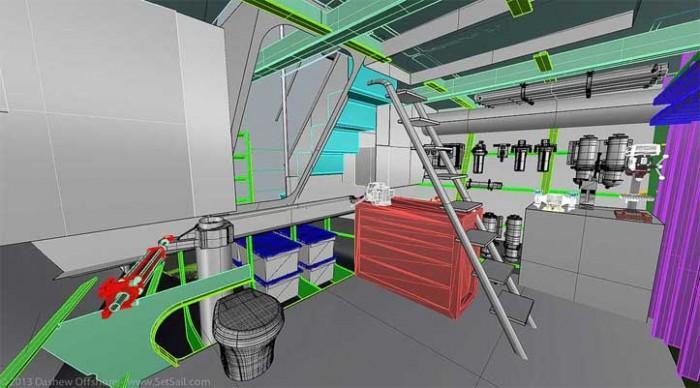
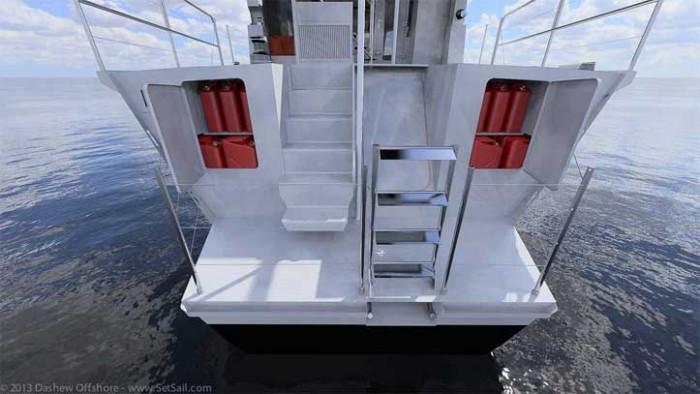
With the evolution of access to this aft area – including a large deck hatch for use at sea (shown above) and entry from the swim step when anchored (preceding rendering) – the possibilities of how this aft area of our FPB 78 might be used have multiplied.
This area has the capacity for:
• A dozen (or more) 20 liter containers of oil
• Eight or more large plastic bins of spare parts under the swim step
• An enormous tool chest (perhaps 40″ long x 20″ deep x 38″ high)
• A work bench with drill press, grinder, bearing press, and vice
• Fuel system
• Watermaker
• Misc. pumps
• A day head accessible from the swim step
• A system for removal of the genset/engines via the workshop entry
• Various essential bits of cruising gear like water skis, tow ropes, dive compressor, scuba bottles, hoses, and shore power cords
• Crew cabin with private entrance
The list above has not changed, but now that we understand the space better, and have the structure integrated, there is a larger space in which to play. The covered deck access means we will use this route to do our hourly engine room check when underway. And it makes it possible for a professional crew member to have a useful stateroom when at sea.
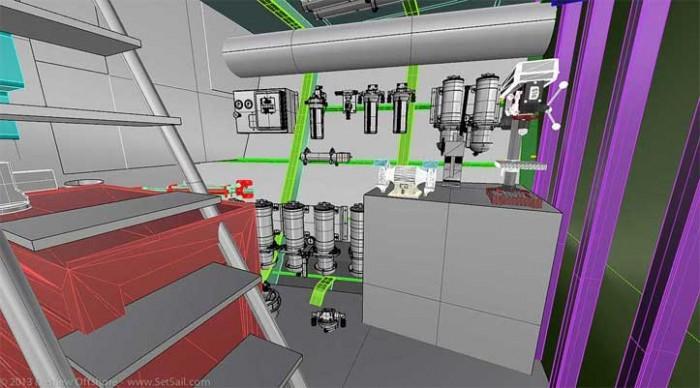
But most important to us, we now have a relatively cool and quiet work shop, where the most maintenance intense systems will live.
The screen capture above is looking to port, showing the engine day tank, fuel system, watermaker and various power tools. The tool chest, work bench and vice are to our immediate left.
Here we are looking to starboard to an otherwise empty area. There is room for a day head, bunk, and a whole lot of storage.
Looking here from starboard to port. Note the storage under the swim step.
Back outside, we have two flammable stores lockers accessible from the swim step. Depending on our final dinghy decision, and where/how the dinks are being used, we might just use one of these lockers for outboard fuel. The other would then be available for stowing garbage.
Aft Deck Layout – Dinghy Options
One of the areas not likely to be finalized prior to launching is in the after-deck layout. There may never be an optimal configuration. The potential uses of this space, and the cruising grounds, vary widely, and what we want in the Arctic is likely to be a lot different than in the tropics. What we are aiming for is maximum flexibility. To us, this means minimum builtins, while making provision for bolting down furniture or lockers in the future, should we suddenly get the urge for semi-permanance.
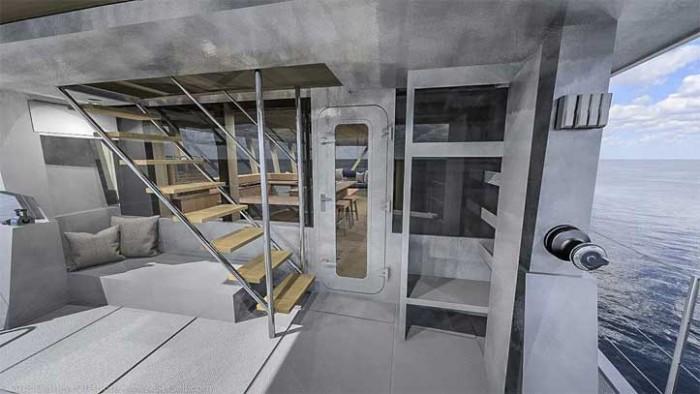
We have decided at this point to have a large locker in the forward starboard corner (shown to the right in the rendering above), against which the main door will open. This locker will be adjustable, with a top and bottom shelf, lots of hooks for jackets and foul weather gear, a hanging rod, and several shallow shelves for deck gear. We will probably carry our abandon ship gear in this locker as well. In addition, we will have a bench seat on the bulkhead against the galley. The space below this will be for storage, sized probably for life raft and related.
Complicating things (in a positive manner) is the Matrix deck. Between the view from the higher elevation, enhanced privacy, and comfortable sofa style seating, we are wondering why we’d use the aft deck for anything other than dinghies.
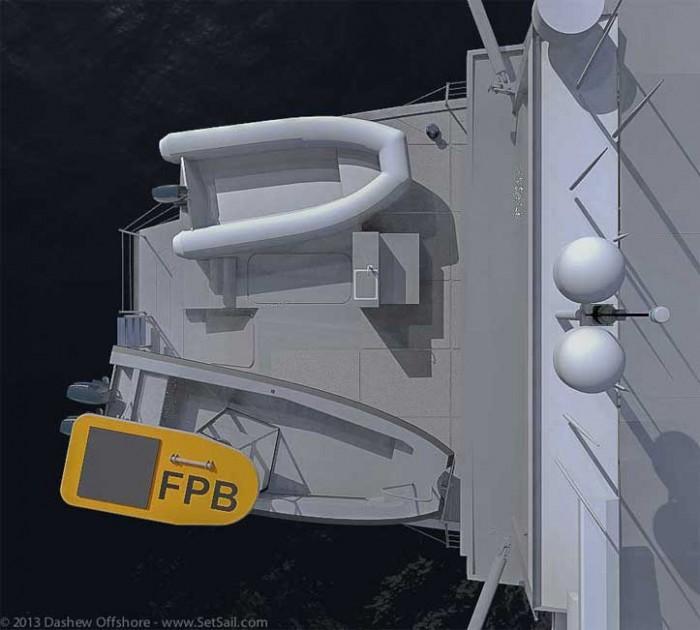
Speaking of which, we have more options for dinghy configuration than before. With the workshop entryway redesigned, there is space for a 2.1 meter/7ft-wide inflatable RIB. This gets us into an inflatable of 15 feet in length, a big dinghy. If we want a little added beam on our metal dink, that is available as well.
On the port side we have room for the 10.5 AB Lamina RIB with an aluminum hull. These are light, strong, and with a 15 or 20HP two cycle outboard really fly. We used the 11.5 version on Beowulf for years and loved it.
A final word on this space. The time may come when we feel the need for a bit of lounging on the lower deck. It is safe to assume that one or both of the dinghies will be launched when this occurs, so there is lots of open deck space. When (if) this occurs, we shall take a short walk forward, and extract a light weight array of patio furniture from the forepeak. And if the dinghies are on deck? We’ll set the furniture up on our commodious forward deck.
MCA Category 0
In the past we have shied away from formal classification of our yachts, as the rules were based on entirely different types of vessels, and represented a significant reduction in capability from our own standards. However MCA Category 0, for vessels under 24 meters measured length, is more flexible and allows us to build under survey, to the very highest standard, without compromising our design or systems in any fashion. The process is time consuming and costly, but compensates by offering both us and our clients an additional measure of independent quality control, and in some markets, will make a substantial difference in resale value.
Put another way, very few yachts in our size range qualify for MCA Cat 0 (their highest rating). And, if they do, it is at massive additional expense. The first two FPB 78s are being built MCA Cat 0.
The Ultimate Get Home Rig
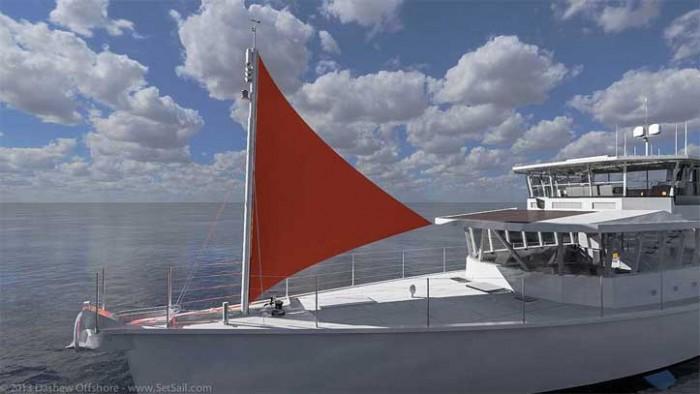
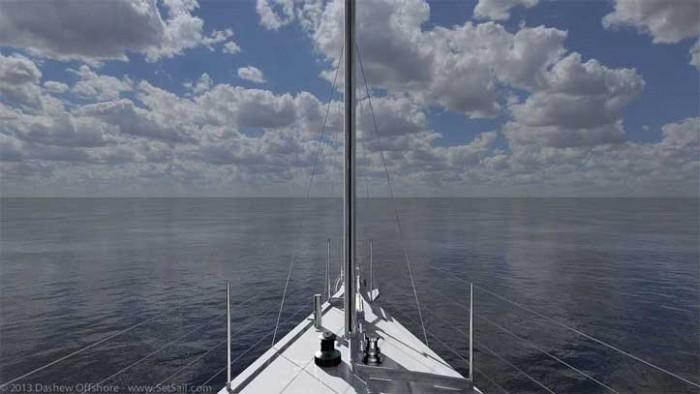
We have been wrestling with a backup sail plan since Wind Horse. The FPB 78 system here has the potential to add a bit to downwind efficiency with little extra effort on our part, as well as get us somewhere in the highly unlikely event of total propulsion failure. It all starts with a taller foremast.
This allows for a reasonable sized jib. The headsail shown above is roughly 300 square feet/28 square meters.
The shape is a bit more efficient than in the past, and far enough forward that we think it will blow the bow off without too much difficulty.
For heavier going we have the possibility of a trisail, double sheeted to the corners of the roof. This allows pulling the clew to windward if needed for blowing the bow off. We think in a good breeze, with the trisail set and natural windage aft, we might make good progress broad reaching and/or running.
There are a host of variables involved, and we expect to have to spend a bit of time experimenting with quick cut-and throw-away shapes, to come up with a suitable configuration.
The foremast will require staying. These are in the way when going forward. But there is sufficient space to slip between the shrouds and spar, and in heavy going they will give us additional handholds.
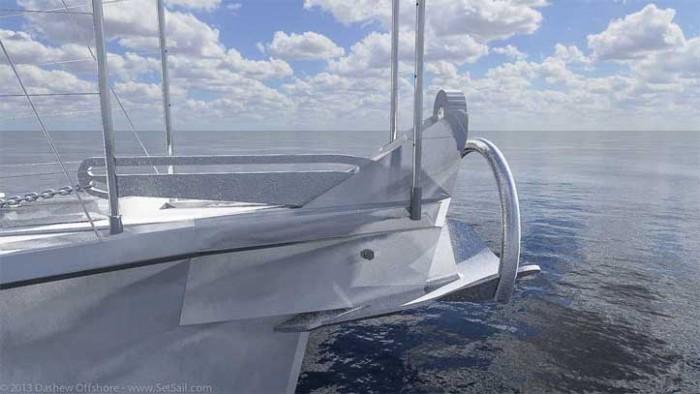
We will close with a detail of the anchor sprit.
The bow roller assembly is shorter and brings the point of the anchor fluke just past the stem fitting. The fluke will be wedged against the roller support cheeks and topside when winched home as shown above. There are handling advantages as previously discussed, but also one disadvantage: the anchor will occasionally bang the stem when being hoisted. We think this is an acceptable tradeoff.
For more information on the FPB 78 visit http://setsail.com/fpb-78-dream-machine/, or contact Sue Grant at Berthon – sue.grant@berthon.co.uk. Berthon are the European agents for the Dashew Project.

